Thursday, March 28, 2024

Picocart 64 AliExpress version - How to Set It Up.

Picocart 64 is the custom N64 flashcart that builds with Raspberry Pi Pico chip board and used to load the game backups of your favorite N64 games. This board is cheaply built and also affordable for everyone unlike those everdrive flashcarts. However, this flash cart had one issues - terrible lack of documentation and also lack of readily made firmware so finding those things is really cumbersome. Fortunately, I managed to get those from someone in South America where he archived these files in his personal storage services. From there, I managed to get this thing done with the PicoCart 64 which I bought from AliExpress. 


Picocart 64s that bought from AliExpress have pre-installed its picocart firmware so user may need to install its game rom. However, not all N64 games are supported with this fancy cart so expect some compatibility issues around it. Also, another problem for users are no firmware files are provided in case of something wrong happens and you want to fix it back. From what I found here, this Picocart 64 requires a suitable N64 rom in .z64 file which only have supported game saves to N64 Memory Pak only and whenever user wanted to switch to new N64 ROM title, flash nuking the Picocart and also reinstalling the firmware is required.  In this guide, I will show you on how to flash N64 games into this flash cart, step-by-step.  


A. Flashing The N64 Game into the Picocart 64 out of the package box

1. Connect the Picocart 64 with USB C cable by plugging in while pressing the "BOOTSEL" button on the pico board. The RPI mass storage will be appeared.  

2. Go to this site PicoCart64 UF2 ROM Builder (kbeckmann.github.io) and load the N64 game in .z64 format only. 

3. Untick the "Compress" option and click "Build UF2. The converted N64 ROM under UF2 file will be created.

4. Copy-paste the converted N64 ROM in UF2 file into RPI mass storage. The process will be slow and it takes some time to complete it. 

5. After finished copying, the Picocart will be automatically disconnect which indicates the UF2 ROM is properly flashed. If the device isn't disconnected automatically means your UF2 ROM is not compatible with the Picocart hence you will need to flash another suitable N64 ROM for that. 

6. Insert the PicoCart onto the N64 cart slot with the Pico board facing front and it should be working correctly when displayed such graphics. 


B. Switching to another N64 ROM title 

1. This methods involves flash nuking the Picocart so reinstallation of firmware is required. Can be also used if N64 ROM failed to boot due to compatibility issues. 

2. Download the Picocart firmware files pack here: https://mega.nz/file/nAMxjCIT#bQBhu0rbV8eGPdUZxjeyeEzsIK3eRRrdO4S5C8JeArM

3. Extract the downloaded fimrware pack. 

4. Connect the Picocart 64 with USB C cable by plugging in while pressing the "BOOTSEL" button on the pico board. The RPI mass storage will be appeared. 

5. Copy-paste the "flash_nuke.uf2" into the RPI mass storage. Do not disconnect the Picocart and it will reappeared again. 

6. Copy-paste the "picocart64-v1-ntsc.uf2" or "picocart64-v1-pal.uf2" into RPI mass storage depending on your console region. 

7. The Picocart will be automatically disconnect so repeat the step 4 above. 

8. Insert new converted N64 ROM file in UF2 format into RPI mass storage. 

9. If the device is disconnected automatically means the file had been flashed properly. 

10. Insert the PicoCart onto the N64 cart slot with the Pico board facing front and it should be working correctly when displayed such graphics. 


Well, for testimonial purposes, I managed to get some shots of working PicoCart on my Japanese N64 console...

KNOWN Issues:

1. Some titles works better when "compress" option was enabled during N64 ROM conversion. However, this will led to users need to power cycle the Picocart first before putting it into the cart slot. Avoid from powering the picocart directly while it is on the cart slot. 


Saturday, June 5, 2021

How to Improve Cheap Chinese Tape Player #2 (2021 update)

 Before that, I had been struggling to use this kind of cheap Chinese tape player and usually it doesn't work out of box as expected without any modifications until I broke my tape player and wasted so much money on this. Then, I'm got an idea to improve these crappy Chinese tape player - by replacing brass spindle on the cassette motor with the plastic spindle. Other methods such as replacing the belts with thinner belts not working because the tape will not achieve desirable speed even I set the pot to the max level. 


What you're gonna need is a plastic spindle with 2mm hole diameter which you can buy it from here: (AliExpress Link). After that, you will need to use flat-head screwdriver to pull out the brass spindle and then put it the plastic spindle into the cassette motor and reassemble back the tape rubber. Then, adjust the tape speed until you reaching the desired speed. You can use 1 khz sine tone tape which you can record it DIY to do adjustment until reaching the right tone. 


After that, you can enjoy the tape collection with this tape player. However, there's another problem with this tape - high treble noise which is some people including myself feeling dizzy after hearing from this tape. There's another way to overcome this by using a specific headphone that can dampens the noise and thus allowing comfortable hearing without bearing high treble noise which is Koss Porta Pro headphone. So far, this headphone gives an excellent hearing experience on any tape players, even though the tape player are producing crappy noise sound. 


However, watch out for fakes which they often sold in plastic packaging instead of cardboard box and usually cheaper than original retail price. If you bought it from local retailer, you're pretty lucky because this item is limited stock for now, but if you bought the fake ones but when paired with crappy Chinese tapes and then feeling comfortable while listening, you're also lucky but cannot guarantee that the fake ones can give similar experience with original ones which came from the box. 

But what about other brands? Other brands may have different experience but if you found other brands that have capable of dampening noise like Koss Porta Pro, you can enjoy it and also tell your friend about the headphone. Headphones for tapes are not always Koss Porta Pro, but there's another alternative that can give similar experience with this particular headphone. 

Here's the recap about this article today:

1. Replace the brass spindle with plastic spindle with 2mm hole diameter.

2. Use a better headphone that able to dampening noise like Koss Porta Pro. 

Thursday, December 24, 2020

Guides on Installing Common Desktop Environment on FreeBSD

Common Desktop Environment - one of the oldest desktop environment for UNIX environment since 90's where most of old-school programmers had their good time with this graphical user interface. Today, this desktop environment had been revived so user with modern PCs can try to install this desktop environment and feel the classical throwback in the 90's.


Today, I'm gonna write on how to install and set up the Common Desktop Environment (CDE) and this guide is heavily aimed at FreeBSD users (sorry, Linux users!)


1. Installing CDE interface

First of all, you will need to obtain the latest ports package first which you will need to compile it yourself.

$ portsnap fetch
$ portsnap extract 

Then, go to CDE ports directory via the command below:

$ /usr/ports/x11/cde

Next, launch the command below to begin building process.

$ make install  

NOTE: If you're having an error during compilation process such as ksh93 is not found, you will need to make a new copy of ksh executable as ksh93 via the command below:

$ cp /usr/local/bin/ksh /bin/ksh93 

1. Configuring CDE interface

Add these line below in /etc/rc.local to start CDE on boot:

/usr/local/dt/bin/dtlogin

To set up CDE Calendar, at these line in /etc/inetd.conf below:

dtspc stream tcp4   nowait  root    /usr/local/dt/bin/dtspcd /usr/local/dt/bin/dtspcd
cmsd/2-5    dgram rpc/udp4 wait root /usr/local/dt/bin/rpc.cmsd rpc.cmsd

Then, add these linds in /etc/rc.conf below:
rpcbind_enable="YES"
inetd_enable="YES"

After that, add these line in /etc/hosts below:
127.0.0.1   HOSTNAME

Friday, June 12, 2020

Setting up FreeBSD on your PC/Laptop after installation

This guide will show you on how to set up your FreeBSD OS after installation. This step is fairly different than the virtualbox guide so you will require some extra step for that.


1. SETUP xorg PACKAGE
It is best to compile the package from scratch rather than install the pre-built ones. You don't want having yourself scratching up your head due to problematic issues such as video playback not working and etc. 1

If you're not installing ports from the FreeBSD installation setup, run the command below to obtain ports package. 
 
$ portsnap fetch
$ portsnap extract 
Then, you will need to install both components first, llvm and meson.
$ whereis llvm
llvm: /usr/share/ports/devel/llvm
$ whereis meson
meson: /usr/share/ports/devel/meson
Next, go to these direcotries and build these packages. This will take a longer time so be patient.
$ cd /usr/share/ports/devel/llvm
$ make install clean
$ cd /usr/share/ports/devel/meson
$ make install clean 
Then, locate the ports package for xorg
$ whereis xorg
xorg: /usr/share/ports/x11/xorg
After that, go to the xorg ports directory and build it from scratch
$ cd /usr/share/ports/x11/xorg
$ make install clean

2. SETTING UP GRAPHICS DRIVER.
Sometimes, installing a graphic driver could be pretty messy especially with Intel GPUs from which I thought that it's pretty easy to install than the Nvidia or AMD counterparts. 

First, install the pre-built drm-kmod package first, pay attention to the terminal output on the screen:
 $ pkg install drm-kmod
New packages to be INSTALLED:
	drm-kmod: g20181126 [FreeBSD]
	drm-current-kmod: 4.16.g20190305 [FreeBSD]
Message from drm-current-kmod-4.16.g20190305:

The experimental drm-current-kmod port can be enabled for amdgpu (for AMD
GPUs starting with the HD7000 series / Tahiti) or i915kms (for Intel
APUs starting with HD3000 / Sandy Bridge) through kld_list in
/etc/rc.conf. radeonkms for older AMD GPUs can be loaded and there are
some positive reports if EFI boot is NOT enabled (similar to amdgpu).

For amdgpu: kld_list="amdgpu"
For Intel: kld_list="/boot/modules/i915kms.ko"
For radeonkms: kld_list="/boot/modules/radeonkms.ko"

Please ensure that all users requiring graphics are members of the
"video" group.

Older generations are supported by the legacy kms modules (radeonkms / 
i915kms) in base or by installing graphics/drm-legacy-kmod.
Then, add these lines into /etc/rc.conf: For amdgpu (newer AMD GPU cards):
 kld_list="amdgpu"
For Intel GPU:
kld_list="/boot/modules/i915kms.ko"
For radeonkms (older AMD/ATI GPU cards):
kld_list="/boot/modules/radeonkms.ko"
NOTE: If you're using Nvidia GPU cards, you might need to take a look at these guides here. Other guides can be followed through this forum link here and also from the FreeBSD handbook guide here.

NOTE: If you're using Intel GPU and having difficulties while activating GPU even though the drm-kmod is installed and added into /etc/rc.conf correctly without syntax error, you might need to take a look at this forum link here.

For Intel GPU, additional steps needs to be taken in order to activate the hardware acceleration. You will need to add the SNA Acceleration mode in /usr/local/share/X11/xorg.conf.d/driver-intel.conf:
Section "Device"
        Identifier  "Card0"
        Driver "modesetting"
        Option "AccelMethod" "sna"
        Option "TearFree" "true"
EndSection
Finally, add yourself to video and wheel group:
$ pw groupmod video -M [username]
$ pw groupmod wheel -M [username]
3. SETTING UP SOUND CARD 
Setting up the soundcard might be different between the hardware and by default, the soundcard can be enabled by this line here in /boot/loader.conf
 snd_hda_load="YES"
However, sometimes, this line might have some issues either your hardware or your current OS versions which your video fail play. So, in order to enable the soundcard without some issues, add these line on /etc/sysctl.conf below
 
  dev.hdac.0.polling=1
  hw.snd.default_unit=1
If you're still having some issues with soundcard which is video is playable but no sound, just edit the value on the line hw.snd.default_unit to 0

4. MISCELLANEOUS
Turn off unnecessary thing like sendmail function:
 sendmail_enable="NO"
      sendmail_msp_queue_enable="NO"
      sendmail_outbound_enable="NO"
      sendmail_submit_enable="NO"

5. WIFI ISSUES
Just to say that FreeBSD not really friendly at detecting wifi devices compared to Linux OS. For now, you might need a USB wifi travel router that have a client capability to connect the wifi via LAN connection like this below:
                                        

Sunday, June 7, 2020

FreeBSD Guide For NOOBS! [PART 2 - Installing some stuffs]

The part 2 of this guide will covers how you are going to install these packages and also how to set up the desktop environment as well. Please pay full attention at this guide and also the output from the terminal as well because there are some extra steps that every user must be taken in order to complete the installation. 

1. SETTING UP STUFFS 

Log in FreeBSD OS as root account. You are required to set up some stuffs.

Then, run the command below: 
 pkg install sudo nano

Next, you will need to set up sudo file and associate with your username. Run the command below:
 nano /usr/local/etc/sudoers


Uncomment the section of the line like this:
 
%wheel ALL=(ALL) ALL
%wheel ALL=(ALL) NOPASSwD: ALL
%sudo ALL=(ALL) ALL
Then, add username into sudoers file:
 amirzaim ALL=(ALL) ALL
Press Ctrl+O to save the file and then press Ctrl+X to exit.

Next, we are going to set up the desktop environment. Xorg package must be installed first before installing any kind of desktop environment. Run the command below:
 pkg install xorg
Next, enter this line kern.evdev.rcpt_mask=6 on file /etc/sysctl.conf to allow ps/2 mouse especially on virtualbox.

.

Then, install the desktop environment. For KDE, run the command below:
 pkg install kde5
For Gnome, run the command below:
 pkg install gnome3
For XFCE, run the command below (login manager need to installed alongside as well):
 pkg install xfce gdm
Desktop environments needs /proc to be mounted, so you will need to add the line proc /proc procfs rw 0 0 on /etc/fstab

Next, open up file /etc/rc.conf and add two lines first:
 
dbus_enable="YES"
hald_enable="YES"

For Gnome/XFCE, add these lines into /etc/rc.conf file:
gdm_enable="YES"
gnome_enable="YES"
For KDE, just add these lines into /etc/rc.conf file:
sddm_enable="YES"
Then, reboot the virtual machine. If you seeing this logon screen, congratulations!


HELP!!! MY FREEBSD FAIL TO BOOT DUE TO SYNTAX ERROR ON /etc/rc.conf FILE!!!
Don't worry! Just enter these command here below to grant the disk access during abnormal boot:
fsck -y
mount -u /
mount -a -t ufs
swapon -a
NOTE: If you're installing FreeBSD on actual hardware instead of virtualbox, then you will need to configure graphics manually. See this FreeBSD handbook for details. 

 Let's go to part 3 to play it around the FreeBSD interface...

Saturday, June 6, 2020

FreeBSD Guide for Noobs! [PART 1 - FreeBSD Installation]

ENOUGH WITH LINUX BULLSHIT, MIGRATE TO FREEBSD!

Second revision: 8 Sept 2023.

Today, I'm writing here on how to set up FreeBSD for users who want to learn something about operating system that is much different than Linux although looks bit same. Let me tell something about FreeBSD - it is an open-source, unix-like operating system, much like Linux but different than Linux. The major difference between FreeBSD and Linux is you can develop a closed-source version of FreeBDS operating system and you are also have rights to remain your modified source codes hidden from public. On Linux, you can't simply closing-source the code and you shall give up the code to the penguin king and then the penguin king is now starting to bitching about it!

FreeBSD operating system mainly popular on high-end server and networking machines rather being popular at desktop but it is also popular at gaming consoles such as Sony PS3/PS4 consoles and even Nintendo Switch as well due to the nature of BSD license clause that allow the creation of close source version of their operating system. On the other hand, FreeBSD is simply a full-fledged operating system when compared to Linux which is just a kernel and heavily dependent with other stuffs that make up the operating system. If you're already expert on Linux, I'm sure that you're might also able to handle FreeBSD OS as well although it's kinda bit confusing at the moment and the way of installation of FreeBSD is I just say - bit similar to Arch Linux but the difference is FreeBSD provides guided CLI-based installer so you don't have to waste your time writing the command one-by-one like Arch Linux. 

Saturday, March 7, 2020

Locked Out Tracks On Music Streaming Services - How To Unlock Them

TL:DR - Just buy that album if possible!

Music streaming services like Apple Music, Spotify, Tidal etc. revolutionize on how to enjoying the music (although it sounds like a mitigation to overcome piracy that eventually killed the traditional physical media) and many people are using it. Although music streaming services provides a countless of music catalogs, however there's a catch - you can't enjoy region-locked albums or songs!

Region-locked tracks are pretty normal especially non-English songs like Japanese song (well, this one is pretty notorious). But, if you're sitting in one particular region and wanted to access the song/album from the region where you lived and then encounters several unplayable tracks that you might seems it as region-locked tracks but it really isn't region locked tracks.

Instead, you're now encountering LOCKED OUT TRACKS!

Example of one album which have locked out tracks

The main cause of these locked out tracks are one particular thing - permission issues on streaming sites. Record labels often have their rights to modify and alter the music catalog and even screwing up you especially you're already paying music streaming subscription when it comes to locked out tracks or albums or even wiping out the catalog from music streaming sites.  So, is there any way to overcome that thing?

If you're using Spotify or other streaming services that only provides music streaming only, there's nothing much you can do about it, these locked out tracks will stay locked out forever until they changed their mind. If you're using Apple Music. there's a great news for you - you can purchase the album to unlock these tracks!

If you're using Apple Music on iTunes program, simply click on the 3 dotted lines on the album you just saved into library and select show in iTunes Store. From there, you can purchase the full album to enjoy the locked out tracks. 

Purchase the album to unlock the tracks. You can see these tracks are marked as "ALBUM ONLY"
Subsequently, you can enjoy streaming these unlocked tracks on Apple Music on smartphone without having to import purchased album track files but it must be accessed from Library section only. If you're using other than Apple Music, look out for album purchase section where you can buy the full album to unlock these tracks. If not, these locked out tracks are remaining locked for a long time. 

Hope this guide helps you...cheers...


Saturday, February 29, 2020

Facebook - The Scrutiny of Freedom Speech

I really hate to write this but I want to write something about Facebook here - It disregards your rights to freedom of speech in the name of "Community Guidelines". It's just really ironic when a certain post from certain language can't be deleted and yet, some posts that I write in plain English or my mother tongue is just getting deleted and having a present surprise - A 3 day ban, or worst 30 days ban.

The problem with Facebook is when you're being forced to accept their community guidelines that is not suit your agenda, political ideology or anything that is not right and whenever you're commented or posted them, you will slapped with a several days ban alongside with warning as well. Also, if you're using Facebook anti-tracking tool like browser extension and etc, you also need to be careful because Facebook is really mad when they can't track what are you browsing outside Facebook.

In Facebook, you are not allowed to criticize about certain things like race, ethnicity, LGBT and so on and even you can't post anything that supports Nazi. But the main problem with Facebook is being double standard when dealing such issues such as religion when they seems don't want to remove the post although the post itself is regarded is defaming other religion. Also, Facebook still failed to adhere cyber-bullying issues where any post that I reported gets ignored pretty often and instead, I was just slapped with a several days ban instead!

Facebook is really famous for privacy scrutiny when Cambridge Analytica harvesting user information which are obtained from malicious 3rd-party apps and ended up having fines of billions of dollars. And it just keep slapped it again and again. I wish that Facebook will be tumble down alongside with its two-somes like WhatsApp and Instagram (I deactivated that thing).

So, if you're using Facebook, pretend that you're using a clown mask, that's it. And, delete FB app and keep using Brave browser instead, you will not being tracked down, let the Facebook collecting rage level and explodes...

PS: These ban just relieved me from social anxiety and FOMO.

Sunday, December 8, 2019

How I'm Improving Cheap Chinese Tape Players

2019 marks the comeback of the analogue format yet compact which rocked the world. This is conjunction with 40th anniversary of Sony Walkman devices since the first model, TPS-L2 which is a cassette player in blue-gray color. Famous artists also jumped into the comeback by releasing their limited edition of pre-recorded cassettes. However, a cassette comeback might hit a roadblock when there's too few better cassette players on the market and only Sony, Panasonic, and even Toshiba are still manufacturing cassette boomboxes. Heck, TEAC/TASCAM are still manufacturing their cassette decks but its price is just not really worth as the decades old deck that can be found mostly on thrift shop or ebay. When you're searching for cassette player on popular marketplace like Amazon, AliExpress, Lazada etc, you will only seeing like these:

Tons of cheap Chinese tapes are out there...
That's what you got when searching for cassette players. Some people are bought these just for doing an audio backup of the cassette tapes into the PC but eventually ended up having horrible playback because the tape runs pretty faster than it standard speed and any attempt to adjust the speed back into standard speed would ended up more horrible sound. Also, the tape have a loud hissing noise that actually comes from the tape motor itself, lack of grounding is the culprit. When you're having these issue, you might just want to throw it and buy a better one. But for those who are pretty crazy about electronics like myself, you can just improve it without having to buy another one (but you still need to buy the better cassette tape too...)

I bought this particular tape player from Shoppe last week and it's pretty amazing with cool design and have a USB power capability so I don't need to have batteries, just a power bank needed. However, this tape also suffering same issue as the cheap Chinese tape players on the market and I had been getting my hands dirty to improving the tape playback quality. There's a lot of way to do it.

No AA batteries required, only a USB cable and a powerbank needed

First of all, I made a minor changes of this tape by adjusting the speed and also changing its rubber belts. It was really lasts for a while before the tape going back into its behavior. Tape speed often fluctuating and still have a horrible wobble sound. Then, I made an another step by replacing its existing tape motor with these one which I took out from the old non-functional cassette player. Also, I put some little bit of solder on the flywheel just to keep the flywheel balanced, noticed that some cheap tape players also suffering from flywheel spins wobbly that causing the tape sounds horribly.

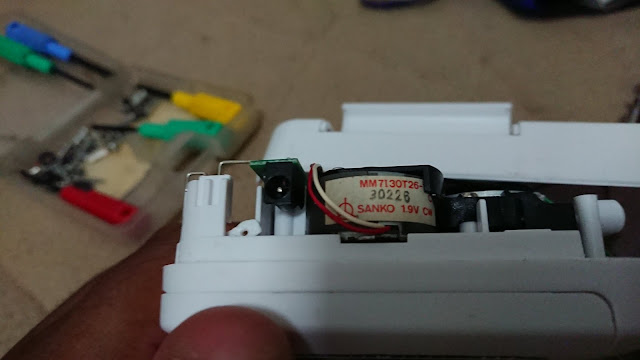
Using this kind of Sanko 1.9V type DC motor on this tape player

Existing tape motor had been taken out, replacing with Sanko tape motor
What I noticed about the existing tape motor is the tape motor was installed with the Chinese knock-off of RF-300C type DC motor which was originally manufactured by Mabuchi. This kind of tape motor also found on most cheap Chinese tape players on the market and this one is could be a culprit of tape playback being too much wobbly sound. It can't be operated at full constant speed, thus you will be noticing a fluctuation of tape playback for a few seconds before back to normal speed and then goes it again.


After replacing its tape motors, put little bit solder on the flywheel and put it anti-magnetic cap on the newly-installed tape motor, it sound better but still there's another problem that needs to be solved - grounding. The tape player now having a noisy buzzing sound that actually comes from the tape motor itself, so I made an another step further by making a ground wiring on the tape player. Putting a solder lead on the screws are not easy but it is good enough for grounding. Originally, the tape player have its grounding spring piece but turns out missing while I'm opening up the back cover during rubber belt replacements ago. Then, I made my own grounding system by connecting these wires from PCB into the screw. Even the tape motor also need to have a grounding system but needs a separate screw and it's pretty dangerous to share multiple grounding wire points with a single grounding base that ended up short-circuit.

Screws serves for grounding the tape

After performing grounding system on this tape player, now the tape player able to play with better sound quality and I have to use USB cable as power source because the grounding screw are placed on the battery slot, so there's no room for batteries anymore but doesn't matter anyway.


Conclusion

In order to improve the Chinese tape players, you will need to do these (or one of these):
a) Change its rubber belts and adjust the tape speed
b) Change its tape motor and put a little bit solder on the tape flywheel
c) Perform ground wiring

Then you can get a decent sound quality on cheap Chinese tape players.


Friday, August 2, 2019

How to Create a Cassette Mixtape

Allright, today we're going retro with making a cassette mixtape. Yeah, cassettes...But why? Because I want to going back to old-school analog style where people in 80's enjoyed their favorite music with the cassette tapes.


Before you're going to do some fancy mixtapes, here's what you're need:

1. Cassette recorder - Either cassette deck or decent boombox with aux input port. Bonus marks when your cassette recorder have noise reduction mode (usually comes with Dolby NR). Also, amplifier is required when you're using the cassette deck.


Cassette deck with noise reduction (bit different than what I got)


Sony boombox comes with CD player and tape recorder

2. Cassette tapes - There are 3 types of cassette tapes: Type I (Ferrite), Type II (Chrome) and Type IV (Metal). If you're going for decent quality, go for Type 1 cassettes and if you're going for CD-like quality, go for Type 4 cassette tapes but it's pretty pricey. 

Why there's isn't Type III? Because this type of tape also called as Ferrite-Chrome tape was a commercial failure so it's pretty rare to see this kind of that tape.

Type II cassette tapes.

3. Aux input cables - Either 3.5mm aux cables or 3.5mm to RCA cable. You might need these to connect your device into the cassette recorder.

3.5mm aux cables

3.5mm to RCA jack cables. 

4. Music collections - self-explanatory. You can get it from various medias. 


After you're have all of these, let's go to Section A for mixtape preparation:


SECTION A - MIXTAPE PREPARATION:

1. If you're want to record it into 60 minutes cassette tape, make a 2 mixtape tracks with 30 minutes each side and you're wanted to do so in 90 minutes, also make a 2 mixtape tracks with 45 minutes each side. 

2. Use any platforms to make a mixtape like Audacity or Spotify, just mix it but watch for its playlist duration. You're gonna record it in one go. 

3. Save the mixtape in mp3 format or whatever you like and export it into your device. 


SECTION B - RECORDING THE MIXTAPE:

1. Plug in your device into aux/line in input port.

2. Check whether sound from the device can be heard from the speaker from the boombox or cassette deck (press record button only for certain models like TEAC).

3. Insert blank cassette tape on the deck. Adjust the position of the tape reel.

4. Adjust the Rec Level on the cassette deck, usually at level 10. For boombox, adjust the volume of the device which plugged in into the boombox, should be at level 60%.

5. Turn off any kind of sounds other than music playback like notifications, screen lock etc on your device. 

6. Press Record and then Play button on the cassette deck (boombox requires both button pressed in same time) and press Play on the device after 1-2 seconds. 

7. Sit back, relax and enjoy the music while recording. Then, repeat for the other side of the tape.

8. After recording, play the cassette tape and enjoy the mixtape!


ADDITIONAL TIPS:

1. Use sound equalizer feature on your device to adjust how the music sound should be comfort for your listening. You might don't want your recording tape sounds better on loudspeakers but terrible on headphones/earphones.

2. Keep an eye out for VU level if you're using cassette deck. If VU level often stays at higher level, means there's a lot of distortion. You might want to readjust the sound settings on your device. 


Sunday, December 30, 2018

How to set up ramdisk in Linux - A very simple guide

RAMDisk is a kind of storage that uses a portion of RAM storage capacity to store files. Although the ramdisk provides a huge speed improvements over HDD and even SSDs, but the main problem is all the files inside the ramdisk will disappear when you turn off your PC or even unexpected shutdown happens. The usage of ramdisk is mainly for speeding up the caching process and also used for making video rendering process much faster.

To set up the ramdisk, you will need to create a directory in the folder /mnt/ramdisk and also set the permission to allow full access:
sudo mkdir /mnt/ramdisk
sudo chmod 777 /mnt
sudo chmod 777 /mnt/ramdisk

Then, you will need to create a new ramdisk, make sure that your PC should have at least 4GB RAM:
sudo mount -t tmpfs -o size=1GB myramdisk /mnt/ramdisk

To unmount the ramdisk, just type this command below:
sudo umount /mnt/ramdisk

Saturday, December 29, 2018

Solid State Drive (SSD): A guide between 2.5" SATA and M.2

Solid State Drives or SSD are evolving rapidly since past years. Back then, it was pretty expensive yet have shorter lifespan although it can boot your PC with such blazing speeds. Nowadays, the SSD lifespan got better and there are also some technological advancement of flash storage technology which allows people to afford it with such bargain price. In the SSD market, there are many types of SSD drives but the very common SSD drives are either from SATA interface or M.2 interface. So, let's talk about the comparison between these type of SSD drives.

What is 2.5" SATA SSD?

An example of 2.5" SATA SSD

Wednesday, August 15, 2018

How to Set Up DXVK DirectX to Vulkan implementation on Linux and Windows

Can anyone tell me what is DXVK?

Well, DXVK is a Vulkan-based translation layer for Direct3D 10/11 which allows running 3D applications on Linux using Wine. DXVK also works on Windows 10 as well and the project is still in development phase, so expect more bugs, errors and crashes!


Prequisites
Before you want to install DXVK, make sure that your PC meets the requirements below:

For Linux

1. A PC/laptop with dedicated GPU card, mainly from AMD/Nvidia with non-free drivers installed. Open source drivers may not work.
2. Latest version of Linux desktop, at least linux version 4.10+
3. Latest WINE staging version only, DXVK will not work on stable builds.

For Windows

1. A PC/laptop with dedicated GPU card, mainly from AMD/Nvidia with latest driver version.
2. Updated version of Windows (at least Windows 7 and above)


Installation Steps

A. For Linux desktop OS

1. Install WINE staging version first, the package should be labelled as wine-staging.

2. Download the latest DXVK builds from this site: https://github.com/doitsujin/dxvk

3. Extract DXVK archive file and copy all .dll files into game directory where the executable sits. You will need to copy it according to the CPU architecture type, either 32-bit or 64-bit.

4. Run winecfg and you will required to add the DXVK dll. library files to override it and set all of it as "Native" only.

5. Before running the game, you might want to see the DXVK HUD that clearly verifies that the game is run with DXVK. To do it, just type it below in the terminal:
$ export DXVK_HUD=1
$ wine mygame.exe

or
$ export DXVK_HUD=devinfo,fps
$ wine mygame.exe

or
$ DXVK_HUD=devinfo,fps wine mygame.exe

If you're using steam, just run the command below:

$ export DXVK_HUD=1
$ WINEPREFIX=~/path/to/prefix wine "~/path/to/prefix/drive_c/Program Files(x86)/Steam/Steam.exe"


6. When the game runs, you will see the DXVK HUD displayed on the top left of the screen. Verify the implementation of DXVK by checking at both [game]_d3d11.log and [game]_dxgi.log text files.


B. For Windows OS

1. Install Vulkan SDK from the website here: https://www.lunarg.com/vulkan-sdk/

2. Download the latest DXVK builds from this site: https://github.com/doitsujin/dxvk

3. Extract DXVK archive file and copy all .dll files into game directory where the executable sits. You will need to copy it according to the CPU architecture type, either 32-bit or 64-bit.

4. Launch the game. Verify the implementation of DXVK by checking at both [game]_d3d11.log and [game]_dxgi.log text files.